Table of Contents
Step 1 – Generating the documents
Step 2 – Distributing the documents
Step 3 – Uploading and verifying justification documents
Step 4 – Validating the medicine dispense
Document Lifecycle

Scheduled
A document is scheduled when a Patient has been assigned a treatment plan. Each document has a theoretical or scheduled date. It is calculated by the system based on the treatment start date, the treatment and rest days. The list is available in the Medicine tab of the Patient.
Generated
It is generated by the system when the Pharmacy, entry/exit date (Lebanon only), prescription code (Bulgaria only) and Composition to be released have been entered and saved.
Downloaded
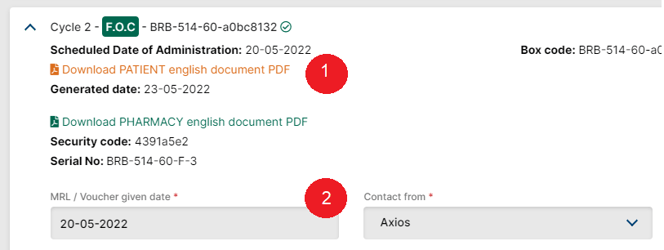
It is downloaded when you click on the link of the generated document. Only then will you be able to enter the MRL/Voucher given date and distribute it.
Distributed
It is distributed (and appears in the Patient’s Summary) when the MRL/Voucher given date is entered and saved.
Documented
It is documented when at least the receipt is uploaded and saved.
Validated
It is validated when you have confirmed the validity of the document by checking the box and saved.
Step 1 – Generating the documents
-
Navigate to your Patient’s Medicine tab
-
Select the Pharmacy in which the Patient will go and pick up the medication from the drop down of Pharmacies that are in registered in the Program
-
If the Pharmacy does not show in the list, visit the Pharmacy section, and make sure it is added to your Program
-
-
Entry and exit date (Lebanon only)
-
Prescription code (Bulgaria only)
-
Product composition and quantity
-
Products and their local prices are configured in the Program Settings section, under the information tab
-
-
Save
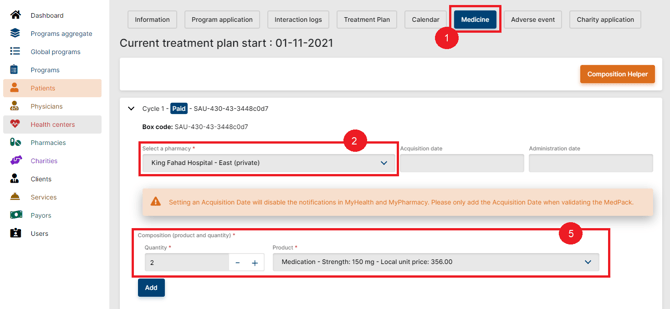
The PMS then automatically generates the relevant document.
Downloading the documents will signal the system that the documents can be released to the relevant stakeholders. It will also unlock, for vouchers, the field to set the voucher percentages.
 Related Articles
Learn more on how to configure the content of your documents at program level in the Local Program Configuration and the MRL/Voucher Configuration articles.
Step 2 – Distributing the documents
Manual Method
-
Download the documents
-
Enter the “MRL/Voucher given date” and the mode of contact
-
Save
Only when the given date is filled will the Pharmacist be able to see the notification in their portal. There, they should fill in the prescription code (if relevant), then will be able to upload relevant documents for this specific medication.
Automatic Method
The PMS now offers an automatic email-sending method, which allows the generated MRL to be sent to the patient and/or the pharmacist.
Prerequisite: an email address must have been recorded for the patient (to send the MRL to patient), for the caregiver (to send the MRL to the caregiver), and for the pharmacy (to send the MRL to the pharmacy). The functionality will be disabled if no email has been provided.
- In Patient > Medicine, under the relevant MedPack: select the pharmacy, enter the MedPack composition and save.
- Click on the
- "Send PATIENT'S letter by email (PDF)" and/or
- "Send PHARMACIST'S letter by email".
- A popup window will open with the following options:
- You can select a caregiver to send the MRL to, along with or in place of the patient.
- You can review the Medicine Letter by clicking the link. Once reviewed, confirm by ticking the relevant checkbox.
- You can review the patient's and/or the caregiver's email, or the pharmacy's email. Once reviewed, confirm by ticking the relevant checkbox.
- Finally, confirm that all previous steps have been carefully reviewed, as it engages your responsibility. Confirm by ticking the relevant checkbox.
- The MRL has now been generated according to the Program's configuration, and sent directly to the relevant emails.
Step 3 – Uploading and verifying justification documents
-
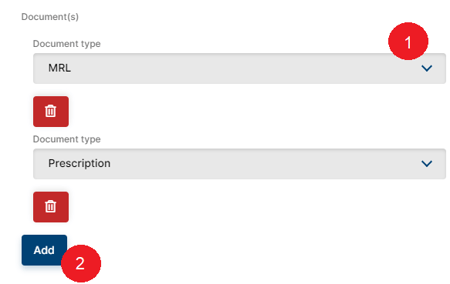
Upload the documents
-
You can add as many documents as needed
-
Verify all documents are clear, signed, and legible
-
Save
Step 4 – Validating the medicine dispense
Go back to your Patient’s Medicine tab. There, you will have the list of all documents uploaded by you and by the Pharmacist. You MUST check the accuracy and clarity of all documents. Once this is done, you should:
-
"Validate this MedPack"
-
Save
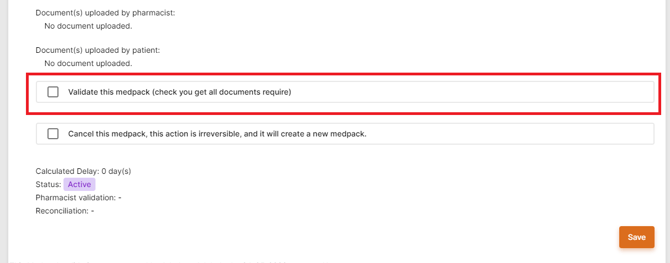
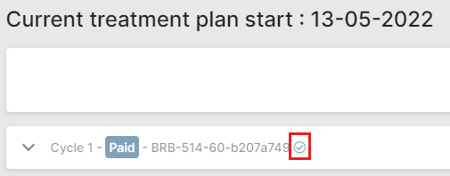
In your Patient Medicine tab, the corresponding cycle will have a green check mark next to it.
The medication will also appear in a green “Validated” in the Pharmacist portal. You should repeat the above steps for each medication.
Related Article
Learn more about the validation process in the article dedicated to MedPack.
IMPORTANT
-
For each medication release, you should also fill in the Acquisition Date (date at which the Patient has received the medication) and Administration date (date at which the Patient has taken the medication). These are used in the data reporting, and not filling them in will skew the reports we send to clients.
-
In a scheme where paid and FOC medications are released, an FOC should only be released when a paid MedPack has been validated.
-
All medication, whatever their type (paid, FOC, voucher, donations) must all be validated before a patient can move to the 2nd set of cycles, when they are renewed.
![]() Going Further
Going Further
Learn more about what happens after the release of the medication in the Reconciliation & payments, Product Delivery & Stock Out, and Deliveries and Reconciliation articles.