Table of Contents
Intro
Please Note
 In the event that you need to change the design of the EL
(Header and/or Footer),
You MUST get approval from the Client AND from the Axios Communications Department to ensure Axios Branding is maintained.
How it works
Located in Program Settings in the MEDICINE LETTER tab, you'll find a whole new suite of options allowing you to tweak, change, and customize MRLs as needed.

While some content will still be automated to make your life easier, the actual text and design will (for the most part) be customizable, but first, let's lay out a couple of rules.
Factory Dimensions and Rules
Naturally, there are things to keep in mind while creating your documents, to make sure the Factory doesn't shut down:
- The width of the images cannot exceed 595px (21cm)
- The max height for the header is 75px (2.65cm)
- The max height for the footer is 25px (0.88cm)
- And finally, the Image resolution should be 72dpi
(We've added the sizes in cm, if that makes things easier)
To learn more about Axios Branding and Guidelines, click here
Creating your MRL
So now you know where to find this Factory and what to keep in mind while using it, so here's how to actually use the MRL Factory.
So first we have the Sample Card:
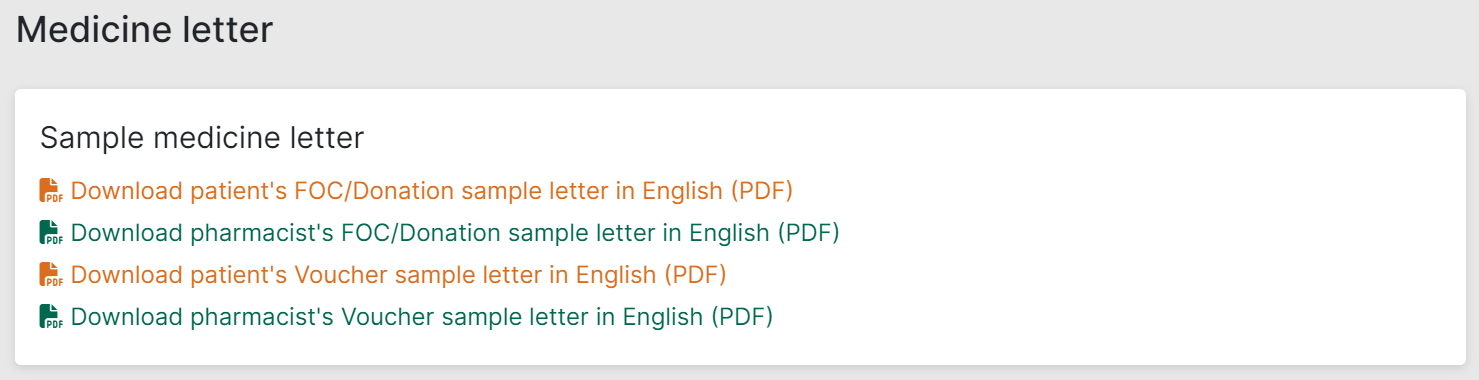
As you can see from the screenshot, the "MRL" Factory has a few more options than its EL counterpart. namely, Voucher documents as well as Pharmacy side documents for both the MRL and Voucher documents. However, as with the EL side, clicking on any of the options shown above will generate your document based on the information you entered.
 Good to Know
Voucher documents are configured on the same page as MRLs. Voucher settings can be accessed by scrolling down on the same page.
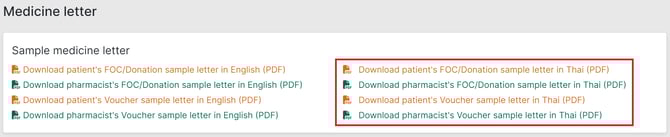
Additionally, if your program has a second language selected in Program Settings > Information, there will be a second version of each option, allowing you to generate a version of your MRL/Voucher that will be translated into the alternative language selected.
Header Image
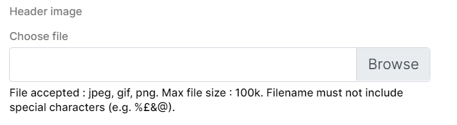
Here you'll be able to upload a header image for your document. When uploaded, and "Save" is clicked, a preview of the upload will show on the right. If there's anything wrong with the uploaded image, you'll get an error message

Here's a tip:
The Axios logo is fixed and will always remain in this location. The Axios logo will also be displayed in front of the header image (if there is one.)
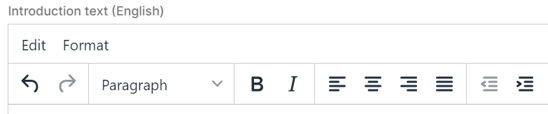
Introduction Text
Here you'll be able to enter the text displayed above the "Patient Information for HCP Review" table. All text boxes feature a very robust selection of editing, customizing, and formatting options, meaning you can unleash your inner design guru and create the perfect document to fit your vision. (Or Program requirements as the case may be)
Additionally, you can add translations for your Program's second language in the text box after this one.
Conclusion Text
Here you'll be able to enter the text displayed below the "For HCP use" table.
Additionally, just like the upper text, you can add the translations for your Program's second language in the text box after this one.
Keep in mind
Only alphanumeric characters, spaces and '+-_.,()[] are allowed.
However, you're allowed to use the next set of variables in the text, for example: [TOKEN_PATIENT_ID], [TOKEN_PRODUCT_NAME], [TOKEN_COUNTRY_NAME].
When used, the value of the variable would be substituted by the real value during the generation process. For example, if our Patient ID is 001, using [TOKEN_PATIENT_ID] in the text will display "001".
Footer Image

Here you'll be able to upload a footer image for your document. When uploaded, a preview of the upload will show on the right. As with the Header image, If there's anything wrong with the uploaded image, you'll get an error message.
Here's another tip:
The document identifier, if filled in the Program Settings, will not appear if a footer image is uploaded. It should therefore be included in the design of the footer.
Creating your Voucher
Voucher creation has the same elements as MRL creation namely:
- Header Image - Here you'll be able to upload a header image for your document. When uploaded, and "Save" is clicked, a preview of the upload will show on the right. If there's anything wrong with the uploaded image, you'll get an error message
- Introduction Text - Here you'll be able to enter the text displayed above the "Patient Information for HCP Review" table. Additionally, you can add translations for your Program's second language in the text box after this one.
- Conclusion Text - Here you'll be able to enter the text displayed below the "For HCP use" table. Additionally, just like the introduction text, you can add the translations for your Program's second language in the text box after this one.
- Footer Image - Here you'll be able to upload a footer image for your document. When uploaded, a preview of the upload will show on the right. As with the Header image, If there's anything wrong with the uploaded image, you'll get an error message.
Fixed Elements
A quick section to highlight the elements that are "Fixed" and will be populated automatically by PMS.
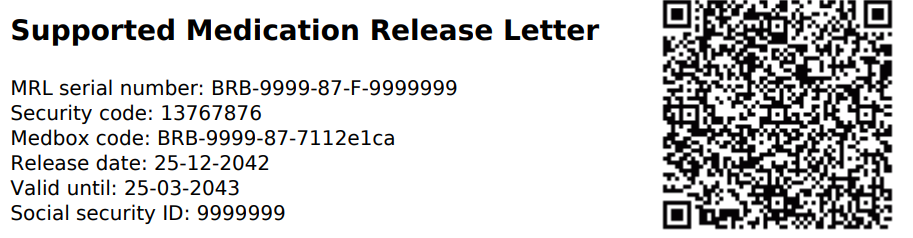
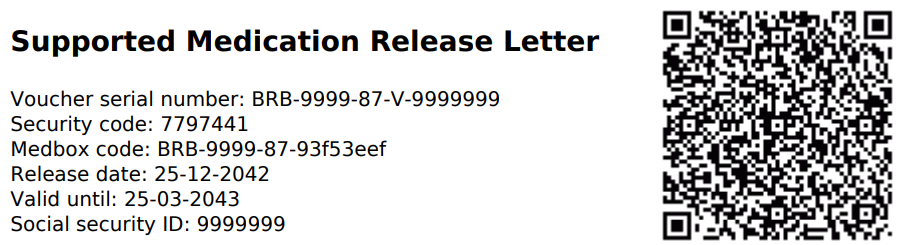
- The "Title - Serial Number - Codes - Release Date - Valid Until - Security ID - QR" element
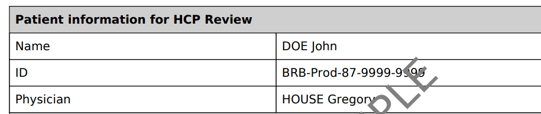
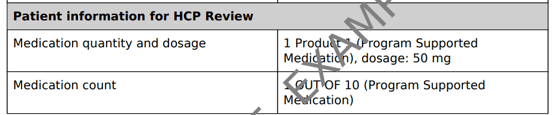
- The Patient Information Tables for HCP review
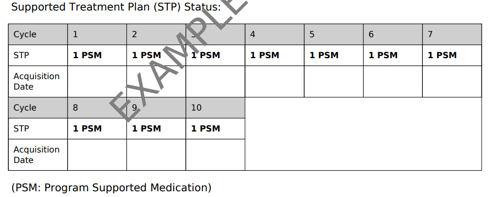
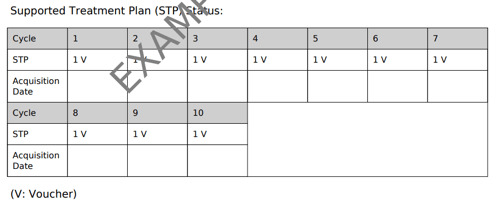
- The STP Status table and its key
- Location for Medication Collection
- Instructions
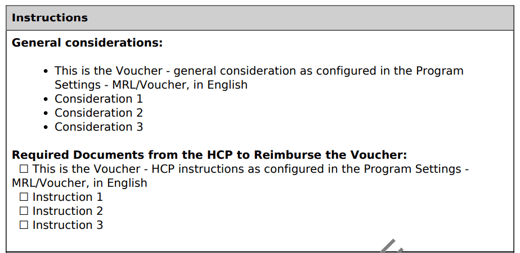
- Filled in the MRL/Voucher tab
- Sign Off


![]() Going Further
Going Further
Learn more about MRL configuration in our dedicated article Medication Release Letter and Voucher Configuration.