Table of Contents
What is the SDV?
The Source Data Validation (SDV) exercise is designed to capture any unreported adverse event that was not identified in Interaction Logs (Physician Interactions excluded) during the review period. The feature has been requested as an addition to the PMS to remove the need for human interaction in the selection process.
SDV Statuses
The SDV can be one of 4 Statuses namely:
Generated – The earliest status an SDV can have. Automatically assigned after SDV generation is completed, regardless of whether internal or external. A “Generated” SDV can move to either:
- Completed status via “Complete SDV” button or
- Cancelled status via “Cancel SDV” button
When clicked, all changes are saved and the SDV is marked as Canceled

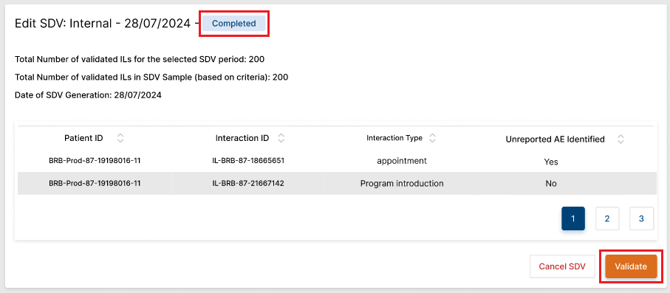
Completed – This status denotes that ALL items in the generated SDV have been checked and the SDV has been marked as “Completed”.
Before an SDV can be given this status, the user must ensure that all items either have a “Yes” or “No” in the “Unreported AE identified” column. A Completed SDV can move to either:
- Validated Status via the “Validate“ button
- Canceled status via “Cancel SDV” button
When clicked, all changes are saved and the SDV is marked as Canceled

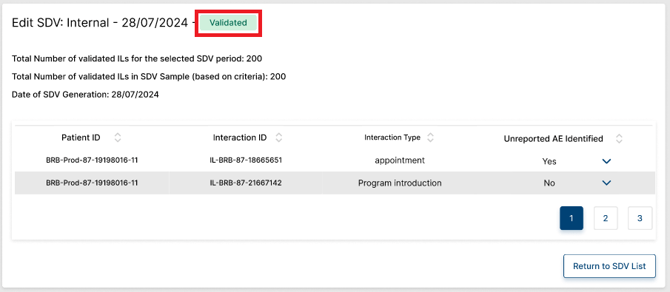
Validated – This status denotes the typical end of the SDV lifecycle as all AEs have been identified and reported. SDVs with this status display as view only.

Canceled - This denotes that the SDV has been cancelled and is no longer to be used
SDVs with this status display as view only.

Activating the SDV
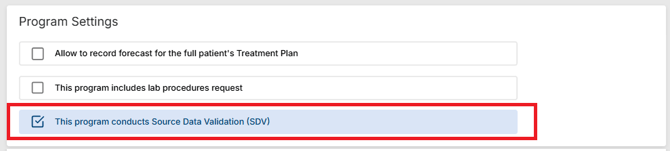
In Program Settings, under the Program Information section, there is a checkbox titled:
"This program conducts Source Data Validation (SDV)”, which is unchecked by default.
When this checkbox has been checked and the changes have been saved, a new tab becomes available in Program Data, titled "SDV".
Generating the SDV
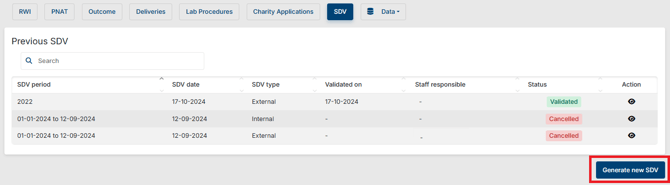
Upon landing on the Program Data > SDV page, the first thing you'll see is a table showing the previous SDVs that have been conducted which can be viewed to see the details.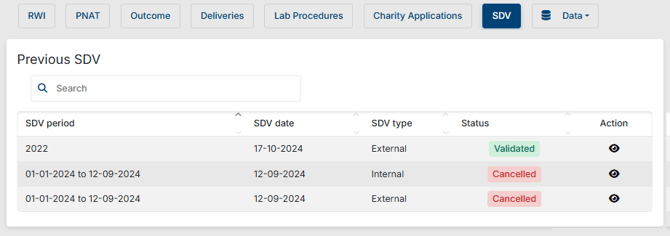
SDV Generation
To generate a new SDV, simply click on the "Generate new SDV" button to get started. You'll be redirected to the New SDV Page where you will be given a few fields to use and customize your SDV.
Available fields for SDV Customization
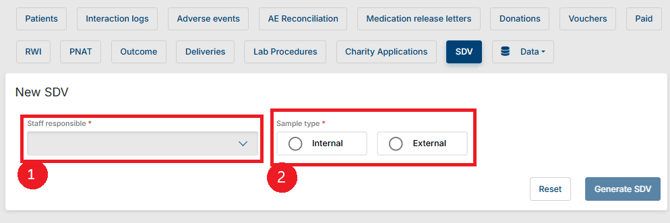
- “Staff Responsible” dropdown
(Only staff who have access to the program and are under the support role will display here) - A field titled “SDV Type” with 2 radio options: “Internal” and “External”.
 IMPORTANT NOTE
Only 1 Internal and 1 External “Generated” SDV can exist at a time.
If a Generated SDV of either SDV Type already exists:
- It must either be Validated or Cancelled before a new SDV sample of the same SDV type can be created.
- The Generate SDV button is greyed out until the existing SDV of the same SDV type is validated or canceled.
-
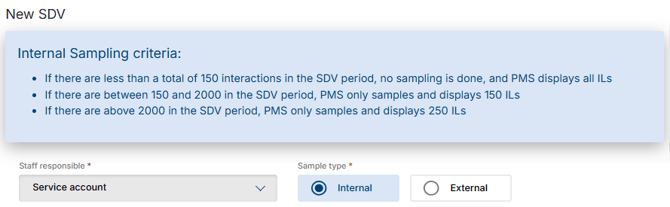
- Internal - In this case, the randomly selected Interaction Logs for each sample must be from the previous year. For example, if no dates are selected, a SDV carried out in 2024 would use data between Jan 1, 2023 and Dec 31, 2023.
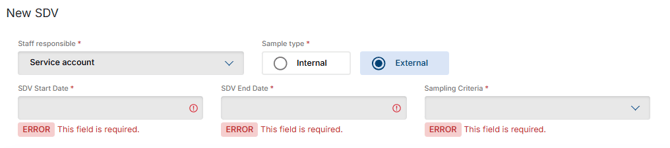
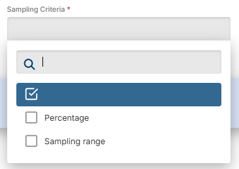
- External - In this case, the randomly selected Interaction Logss for each sample will be based on client selection criteria. PMS uses manual sampling criteria to select and display the randomly generated Interaction Logs from the selected SDV period. There are 2 criteria for External:
- Internal - In this case, the randomly selected Interaction Logs for each sample must be from the previous year. For example, if no dates are selected, a SDV carried out in 2024 would use data between Jan 1, 2023 and Dec 31, 2023.
-
-
- Percentage - allowing the user to specify what percentage of validated interaction logs in the Program should be randomly selected for the generated SDV sample.

- Sampling Size - allowing the user to specify how many randomly selected ILs are to be displayed in the sample.

- Percentage - allowing the user to specify what percentage of validated interaction logs in the Program should be randomly selected for the generated SDV sample.
-
- With all your criteria selected, click "Generate SDV" to generate. When clicked, you'll be redirected to a new screen that shows the results of the SDV, titled “Edit SDV”, at this point the SDV Is marked as Generated.

Sample Item Verification
For Interaction Logs selected in the sample, you must review all items in the sample to verify that all AEs have been captured and reported. This review involves checking attachments, source email, everything, list of items from ILs, etc.
During this check, you must verify whether there is an AE linked and if that AE has been reported to the Client:
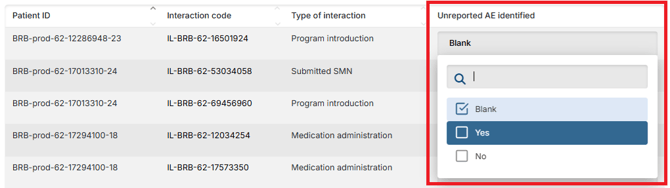
- If an AE exists and has not been reported to the client, you are responsible for reporting that AE to the Client immediately.
- In this case, you report the AE to the client, then return to the SDV sample and select “Yes” in the "Unreported AE identified" column before moving to the next item in the sample.
- If an AE exists and has been reported to the client, simply returns to the SDV sample and select “No” in the "Unreported AE identified" column, then move to the next item in the sample.
- If there is no unidentified AE, simply return to the SDV sample and select “No” in the "Unreported AE identified" column before moving to the next item in the sample.
Validation Rules
- The Program Supervisor is responsible for validating the SDV by checking to ensure that ALL interaction logs have the correct selection of “Yes” or “No” in the “Unreported AE identified” column
- The Program Supervisor will be informed that he needs to check and validate the SDV Sample via an “SDV Table” at the bottom of their PMS dashboard.

IMPORTANT
All ILs must have either a “Yes” or a “No” under “Unreported AE identified” for the SDV to be marked as Completed and as Validated.
- Cancellation
The Program Supervisor can cancel the SDV sample via a Cancel button in the bottom right of the screen when viewing a “Completed” SDV. Clicking this button will mark the button as Canceled, making it view only.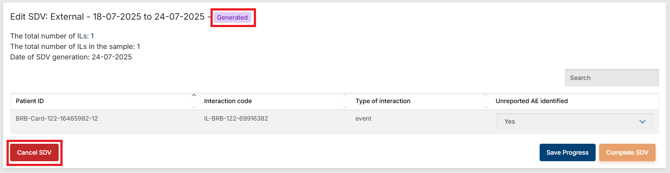
- Saving progress
Progress can be saved using the “Save Progress” button. When clicked, all changes to the SDV sample are saved but the SDV remains in “Generated” status.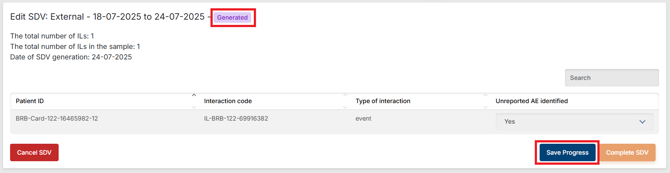
- Completion
The Program Supervisor can also complete the SDV via the "Complete SDV" button. When clicked, the SDV is marked as Completed.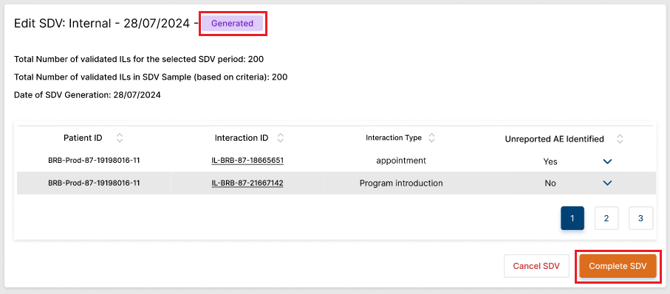
- Validation
The Program Supervisor will be able to Validate the SDV sample via a “Validate” button in the bottom right of the screen when viewing a “Completed” SDV. Clicking this button will mark the button as Validated, making it view only.