Table of Contents
When Should STP Configuration be Reviewed?
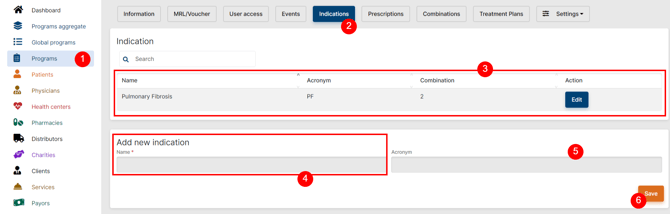
Indications
-
Navigate to your Local Program and edit it
-
Go to the Indications tab
-
Your previously entered Indications appear at the top
-
Add the full, approved Indication (avoid special characters when possible)
-
Select a relevant acronym (not mandatory)
-
Save
-
Once saved, the Indication should appear on the page. If it does not, navigate to any other tab and come back to your page before adding it again
-
-
Repeat as needed
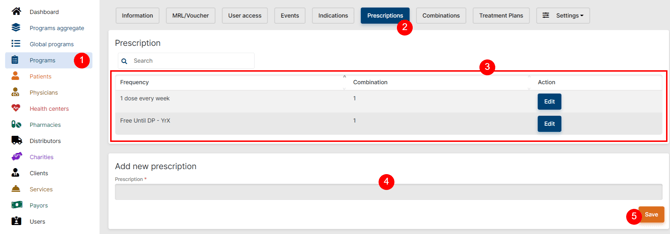
Prescriptions
-
Navigate to your Local Program and edit it
-
Go to the Prescriptions tab
-
Your previously entered Prescriptions appear at the top
-
Add the full, approved Prescriptions (avoid special characters when possible)
-
A prescription should contain the dosage, e.g., 1 vial/blister/dose/… every X day/week/month
-
-
Save
-
Once saved, the Prescription should appear on the page. If it does not, navigate to any other tab and come back to your page before adding it again
-
-
Repeat as needed
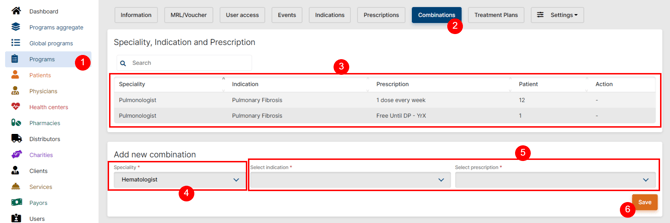
Combinations
Combinations are key to allocate Patients to the proper medicine and dosage. They are the combination of a Prescription for a given Indication in a defined Specialty:
-
Navigate to your Local Program and edit it
-
Go to the Combinations tab
-
Your previously entered Indication and Prescriptions appear at the top
-
Select the Specialty the Program is aiming to treat. Be consistent: this specialty will have to be the same for any Combination, Physicians, and Patients allocated to this Program.
-
Select the relevant Indication and Prescription
-
Save
-
Once saved, the Combination should appear on the page. If it does not, navigate to any other tab and come back to your page before adding it again
-
-
Repeat as needed
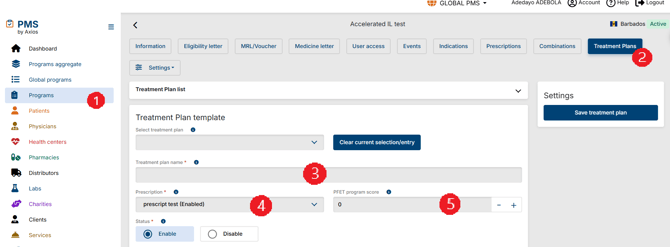
Treatment Plans
Info Icons
Each item in the Treatment Plan now has an info icon next to it. Hovering over this icon will give you information about the corresponding field.

Setting up your Treatment Plan
-
Navigate to your Local Program and edit it
-
Go to the Treatment Plans tab
-
Select a name for your treatment plan
-
Suggestion: Start with STPXX-Dosage, where XX is the PFET score
-
STP0 to 9 should be written STP00-09 to ensure the alphabetical order
-
- Select the appropriate Prescription
-
Enter the PFET score corresponding to this treatment plan
-
Important: A Patient with the same PFET score and Prescription will automatically be allocated this Treatment Plan
-
There should be only one treatment plan for a specific Prescription and PFET score
-
Leave blank if PFET is not relevant to your Program

-
-
Select the number of treatment days (T) and rest days (R)
-
For a treatment taken every 21 days (cycle=21 days), treatment = 1 and rest = 20 days
-
For a treatment taken every day with 28-day cycles, treatment = 28 and rest = 0
-
-
The total number of cycles
-
You may add as many treatments as you wish. Each treatment will appear after the previous
-
-
Based on what you enter for #7 and #8, the cycles will appear below
-
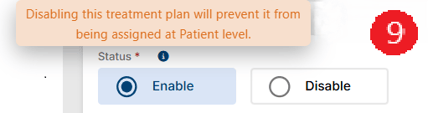
Remember to enable your STP when needed, otherwise it will not be available at the Patient Level
-
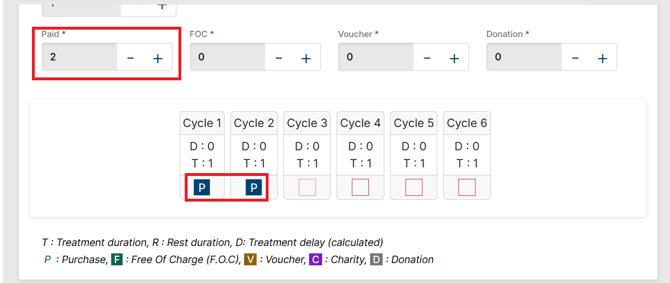
Select the number of medications that will be picked up by cycle
-
A MedPack slot will appear in each cycle
-
-
The number of paid, FOC, Voucher and Donation for the entire Treatment Plan
-
Click each medication checkbox to select the appropriate type of medication, according to the below key
- As part of a recent change, the system will only allow you to allocate each MedPack acquisition method based on the value entered into the corresponding Acquisition method field. If Paid = 2, user can only assign 2 Paid to MedPack slot
-
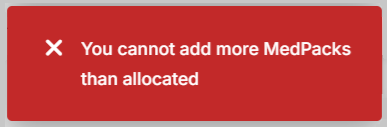
If a user tries to add more MedPacks than the value entered into the corresponding Acquisition method field, the system displays an error.
-
If you have configured your Local Program to allow for Charities, you will be able to pick Charities there too

- As part of a recent change, the system will only allow you to allocate each MedPack acquisition method based on the value entered into the corresponding Acquisition method field. If Paid = 2, user can only assign 2 Paid to MedPack slot
-
Save the treatment plan
-
Repeat for each treatment plan your Program needs
Related Articles
 To learn more about Treatment Plan general knowledge, please check the About Standard Treatment Plan article.
To learn about how to manage a Treatment Plan at Patient level, please check the Patient Treatment Plan article.
When Should STP Configuration be Reviewed?
I cannot find the physician for my patient
If your physician is not available for selection at the Patient Level, it could indicate that a combination with the correct specialty has not been added.
In the Program Settings, create the proper combination with the correct specialty, prescription and indication.
Alternatively, if the Program Settings have been configured properly, check to ensure the right specialty has been assigned to the right physician.
A new indication or/and prescription has been approved for a product
This will need to be added to Program Settings, including new combinations and Treatment Plan templates.
Treatment Plan cannot be assigned to the patient by the PMS
2 reasons can explain this situation:
- 2 STPs with the same PFET score and prescription are enabled. PMS doesn’t know which one should be assigned
- There is not TP enabled for the prescription
The scheme is not matching the PFET score
There is no STP enabled for the PFET Score. In that case, system will allocate the enabled TP that has the closest higher PFET score.
E.g. If PFET score for patient is 3, but scheme is the one for PFET 4, it’s surely because there is no TP enabled for PFET score 3.
Treatment days and Rest days are inconsistent
STPs settings should be reviewed and numbers adjusted
Client provided new Treatment Plan templates
These new schemes will need to be added, or the existing schemes will need to be updated. If some schemes are not relevant anymore, these will need to be disabled.
Specific Cases
Loading Dose and Maintenance Dose
What to do when your prescription includes a loading dose?
We advise to create 2 prescriptions: Year 1 and Year X.
- Year 1: will be the prescription that includes the loading dose. A specific STP that includes the loading dose should be created for this prescription.
- Year X: will be the prescription for renewals, with STPs that does not include the loading dose.
The most important here is to remember to change the prescription before renewing the patient.
Free Until Disease Progression
Some programs are based on a “Free until disease progression” model. This means that once Year 1 is completed, the renewal will offer only FOCs as long as the patient has a satisfactory response to the treatment. The management of this specific case is similar to the Loading and Maintenance dose differentiation. A specific prescription will be created for Year 1 and for Year X, this last one including a full FOC scheme.
Again, it is important to remember to switch the prescription before the renewal. Also, as the TP is still set for a Year, you will still need to renew patient each year.
Going Further
To learn more about program configuration, please check the Local Program Configuration article.
To learn more about program materials setting for your program, please check the Program Content Configuration article.
To learn more about program data and statistics, please check the Program Data and Statistics article.