Table of Contents
Configure Reminders and Medicines
Configure Financial Status and Standard Treatment Plan
Activate, Delete or Close the Local Program
Prerequisites
Before being able to create your Local Program, there are a few requirements that need to be met:
- The Client should be created if it doesn't already exist in the PMS.
- The Product should be created if it doesn't already exist in the PMS.
- The Global Program should be created if it doesn't already exist in the PMS.
Related Articles
 For Client and Product creation, please check the Creating a Client & Product article.
For Global Program creation, please check the Creating a Global Program article.
Create your Local Program
-
Navigate to Program
-
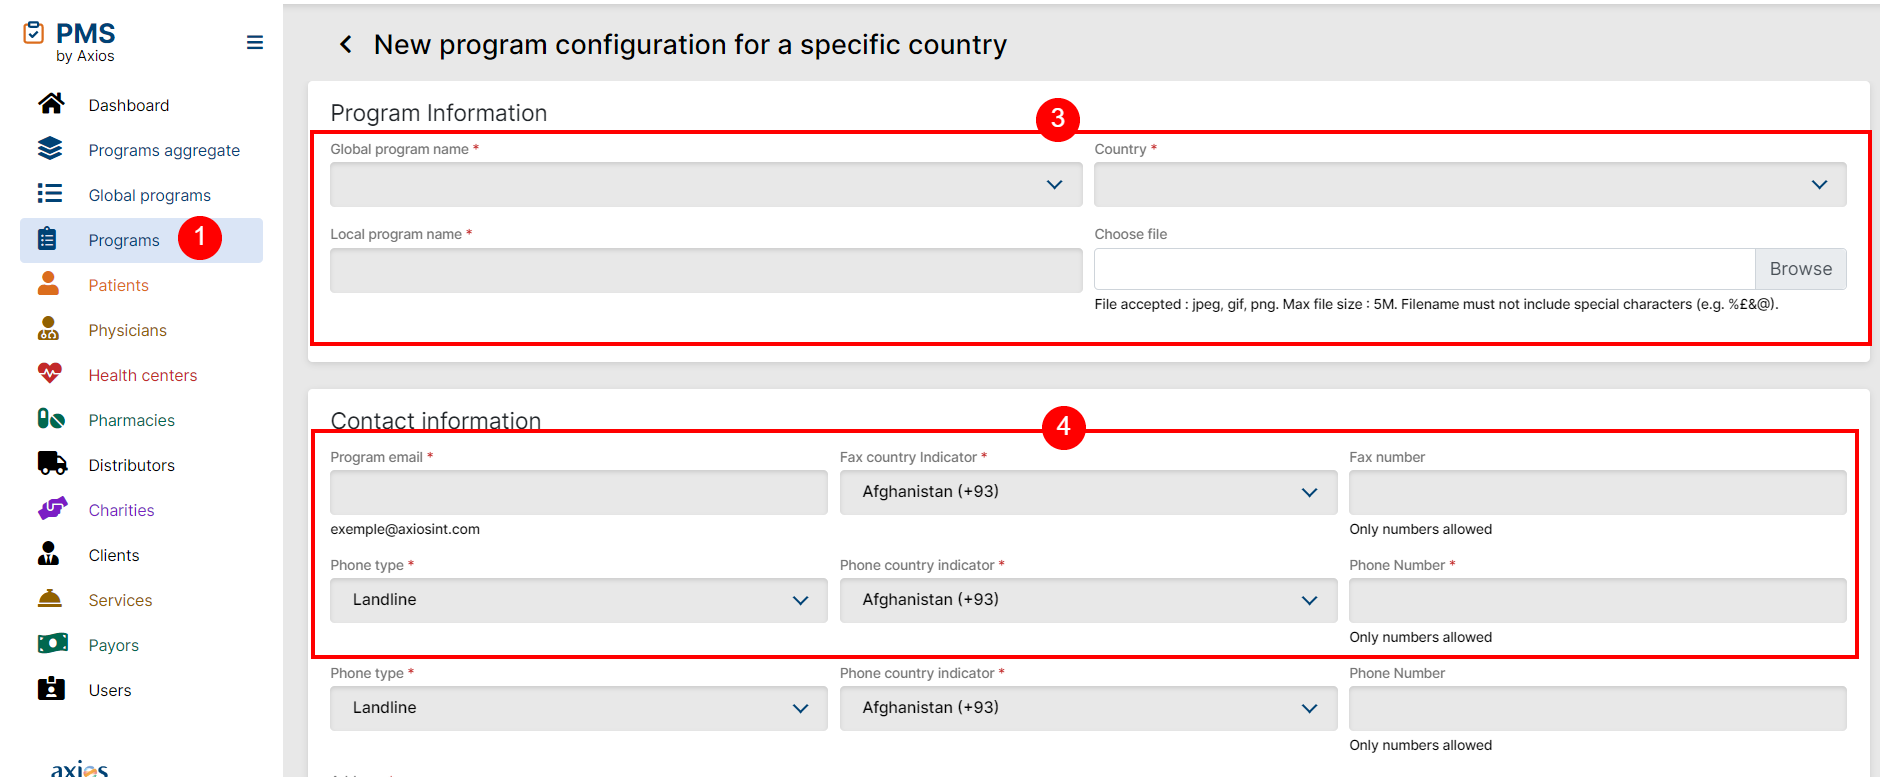
Add a new Program by clicking + Programs
-
Enter the Global Program information and country for the Program
-
The logo is not mandatory but advised. Maximum height for the image is 52px
-
-
Input the Program’s contact information
-
Email address must be @axiosint.com
-
Country codes for fax, landline and mobile must be of the Program’s country
-
Only numbers are allowed (no space, hyphen, extension, etc.)
-
-
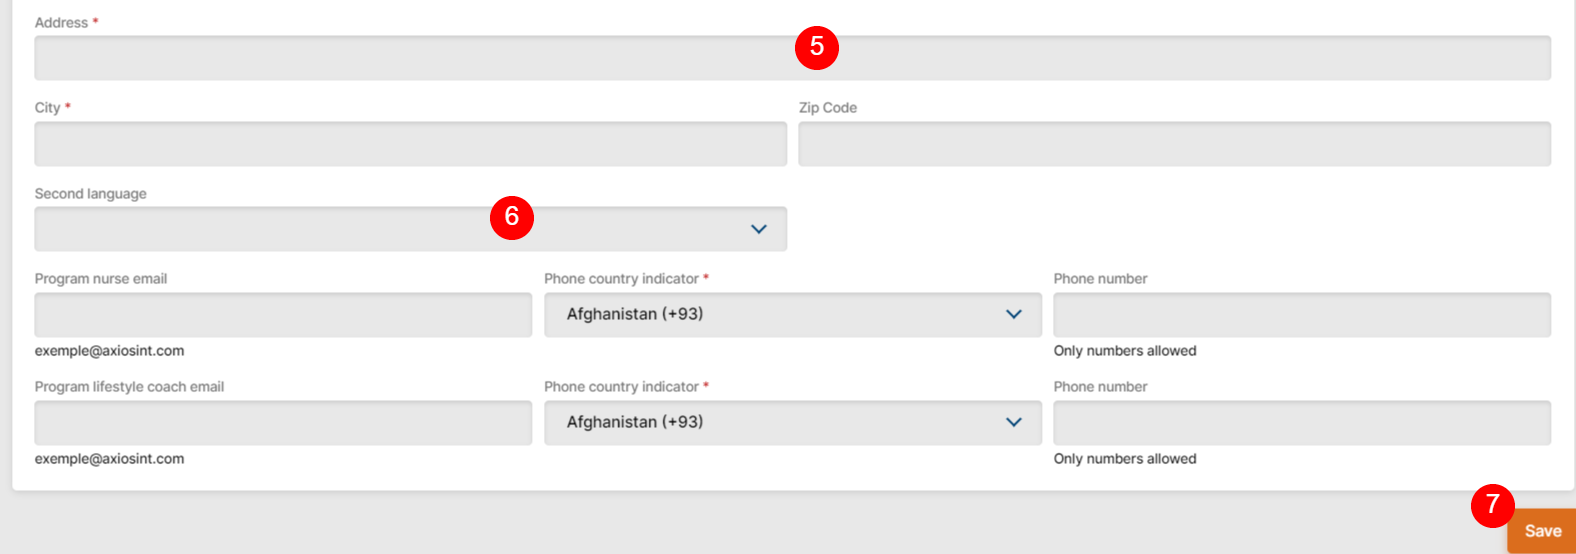
Enter the Program’s address
-
If not available, select the city where you are located
-
-
Select the secondary language (only Arabic is available for now. More languages to come)
- Save
Program Settings
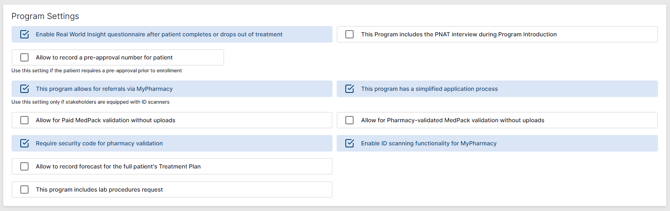
Several settings are available to personalize your program.
- Enable Real World Insight questionnaire after patient completes or drops out of the treatment. Find more information on the Real World Insight (RWI) page.
- This Program includes the PNAT interview during the Program Introduction. Find more information on the Patient Need Assessment Tool (PNAT) page.
- Allow to record pre-approval number for patient. Use this setting if patient requires a pre-approval prior to enrolment.
- This program allows for referrals via MyPharmacy. This setting is only for ID Scanners equipped stakeholders (UAE only).
- This program has a simplified application process. The application process will be limited to Referral - Introduction - Pre-enrolment steps.
- Allow for Paid MedPack validation without uploads. No document will be mandatory to be able to validate the MedPack.
- Allow for Pharmacy-validated MedPack validation without upload. No document will be mandatory to be able to validate the MedPack if it has been validated already by the Pharmacy using MyPharmacy.
- Require security code for pharmacy validation.
- Enable ID scanning functionality for MyPharmacy (UAE only).
- Allow to record forecast for the full patient's Treatment Plan. Will activate the option to enter the composition of forecasted medicines under the patient's treatment plan.
This information will be recorded as “Initial prescription” in program patient’s export (column DC). - This program includes lab procedures request. Learn more on the Lab Procedures Requests page.
Mobile Apps
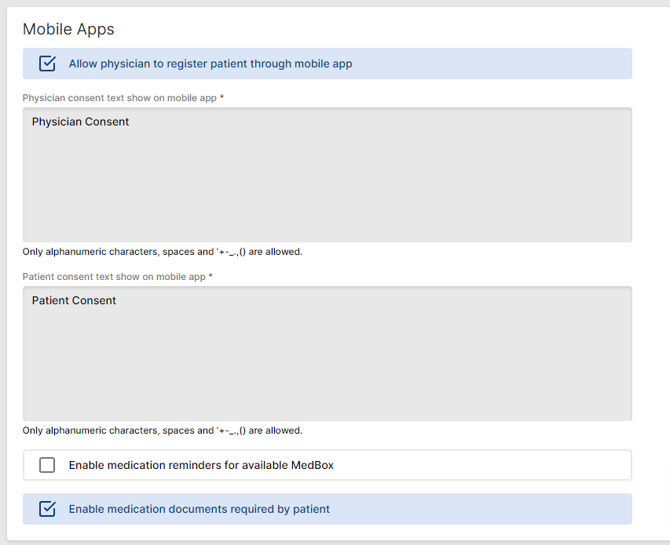
Various options, as well as consent texts can be set if your program uses the Axios+ Ecosystem.
- Use the checkbox "Allow for physician to register patient through mobile app" if you want to allow physician to register patients themselves using MyPatients.
- Enter and personalize the Physician Consent text that will show in the mobile apps. Be careful with special characters that can prevent from saving the page.
- Enter and personalize the Patients Consent text that will show in the mobile apps. Be careful with special characters that can prevent from saving the page.
- Use the "Enable medication reminders for available MedBox" checkbox to activate the medicine reminder in MyHealth.
- This will trigger a push notification reminder, when the MRL/Voucher "Given Date" is filled and saved, and within 15 days of the date, to the patient's device.
- Subsequent reminders will be sent 7, 3, 1 and the day of scheduled date.
- Use the "Enable medication documents required by patient" checkbox.
- This will trigger a push notification reminder to the patient's device, after the scheduled date, to remind the patient to upload the documents.
- This will go out to the patient if and only if the MedPack is not validated in PMS.
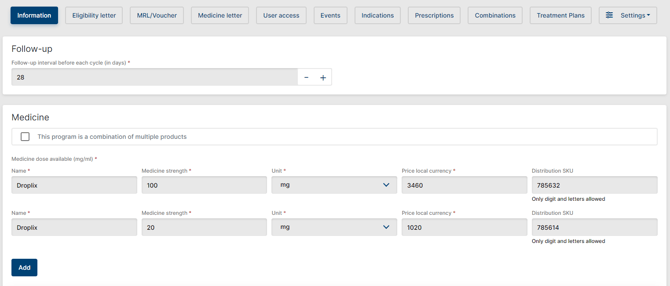
Configure Reminders and Medicines
-
Access the Program Information tab.
-
Scroll to Follow up and select when you want to be reminded to follow up with your Patient ahead of each cycle.
-
Enter the medicine(s) for this Program
-
The local price here will be used on the documents to reconcile the financials with the Pharmacies. Enter it carefully, and check with your PM or Director if unsure.
- The distribution SKU is not mandatory, but serves as a unique identifier for specific medicine and is provided by Pharma/Distributor. It is tied to specific medication and doses, meaning Product 1 - 50mg and Product 1 - 100mg would have different SKUs.
-
If your Program involves multiple products from the same client, make sure to check the "This Program is a combination of multiple products" checkbox. Please note that a local program will need to be created and activate for each product (if it does not already exist), so it appears in the product list (similarly to EBP product creation).
-
- Click "Update Program Information" button to save changes
Configure Financial Status and Standard Treatment Plan
-
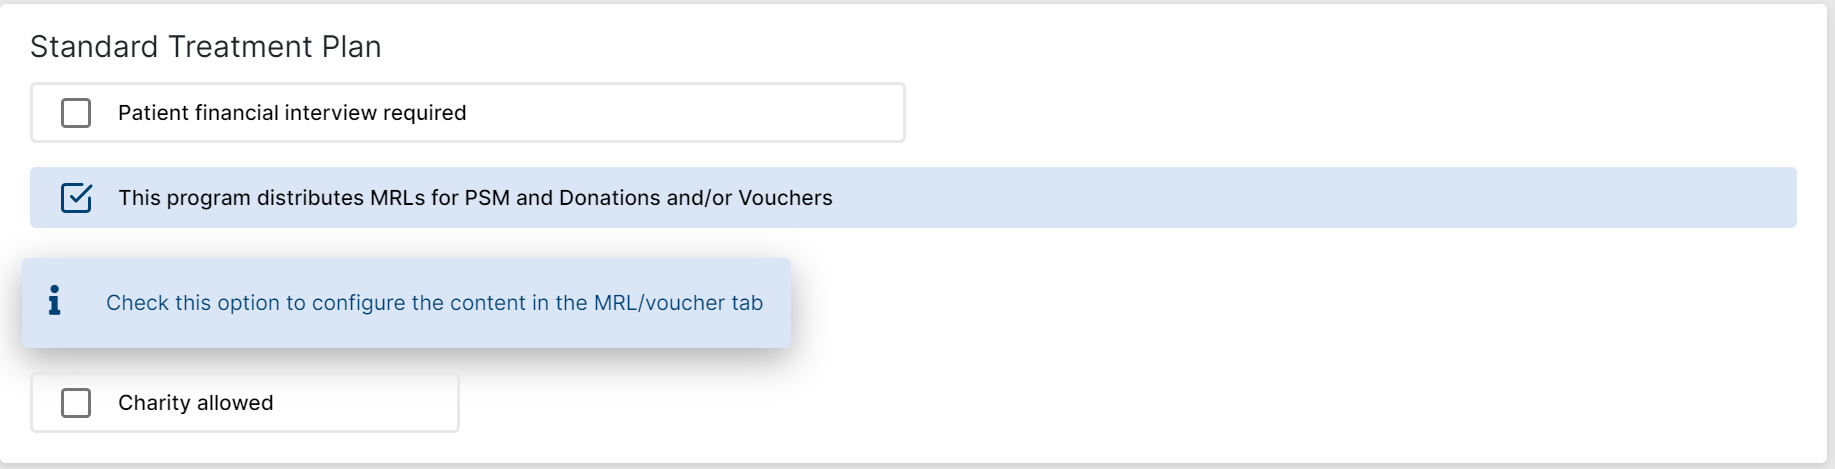
Do you need to conduct a financial interview with your Patient to enroll them in your Program?
-
If yes, an extra step will be added to the Patient’s Application process for you to conduct that interview
-
- Are there Standard Treatment Plans to be configured, and will documents be delivered for your Patients to pick up their medicine?
- If yes, several options appear for you:
-
-
-
Will there be Charities involved?
-
Should the documents display the Patient’s STP (Standard Treatment Plan)?
-
Should we display a stock receipt acknowledgment on the documents?
-
Should the documents indicate the entry and exit dates of the Patient? (only applicable to some Programs)
-
-
Program Services

The services available in the program should be selected in this section. For more information, make sure to check the Program Services and Subservices article.
Configure MRL
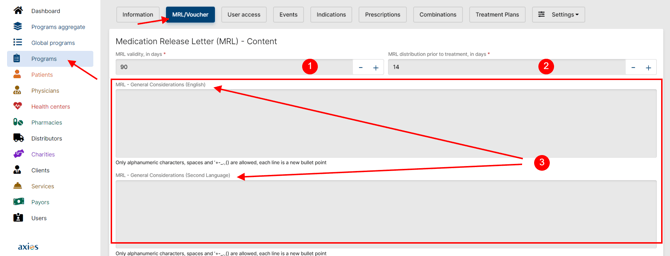
In the Information tab of your Local Program, if your Program has the STPs enabled, you can under the MRL/Voucher tab:
-
Configure the MRL validity period: how long can a Patient use the document to pick up their medicine, after the date of issuance.
-
How long before treatment you will be reminded to distribute the MRL
-
Update the MRL instructions configured in the previous step
-
Save
Related Article
For more information on how the configuration affects the MRL, check the dedicated article on Medication Release Letter and Voucher Configuration.
Configure Vouchers/EACs
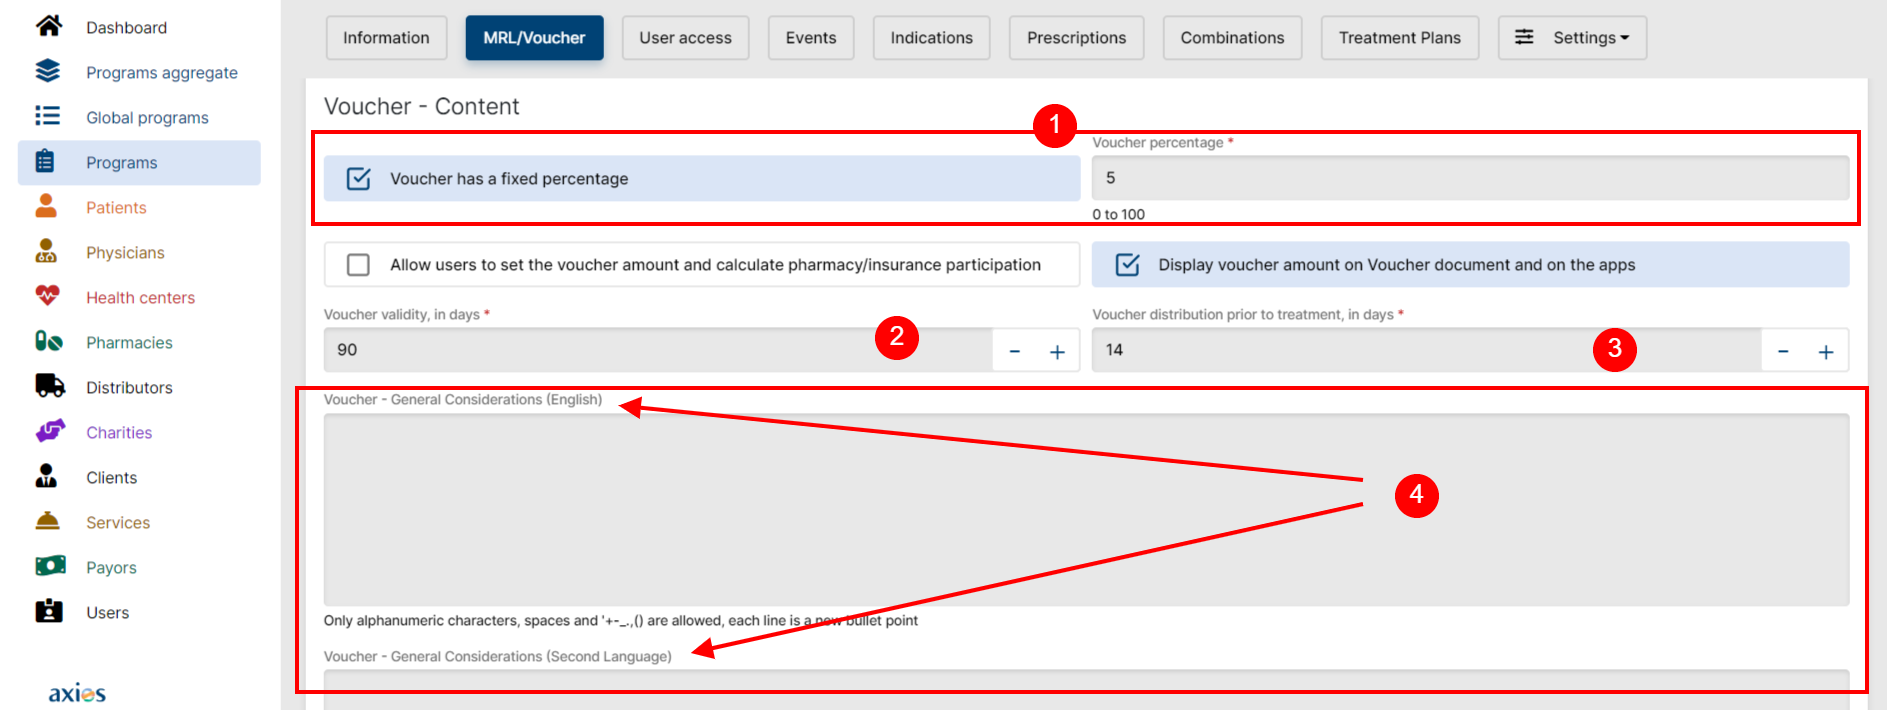
Like the MRLs, you can also:
-
Configure your Voucher/EAC percentage, and whether it is fixed or variable
-
Configure the Voucher/EAC validity period: how long can a Patient use the document to pick up their medicine, after the date of issuance
-
How long before treatment you will be reminded to distribute the Voucher/EAC
-
Update the Voucher/EAC instructions configured in the previous step
-
Determine whether the Voucher/EAC has a unique prescription code
- Allow user to set the voucher amount and calculate pharmacy/insurance participation
User will be able to set the voucher amount, pharmacy and insurance coverage manually for each voucher (in the Patient > Medicine tab). -
Save
Related Article
For more information on how the configuration affects the Voucher, check the dedicated article on Medication Release Letter and Voucher Configuration.
Manage User Access
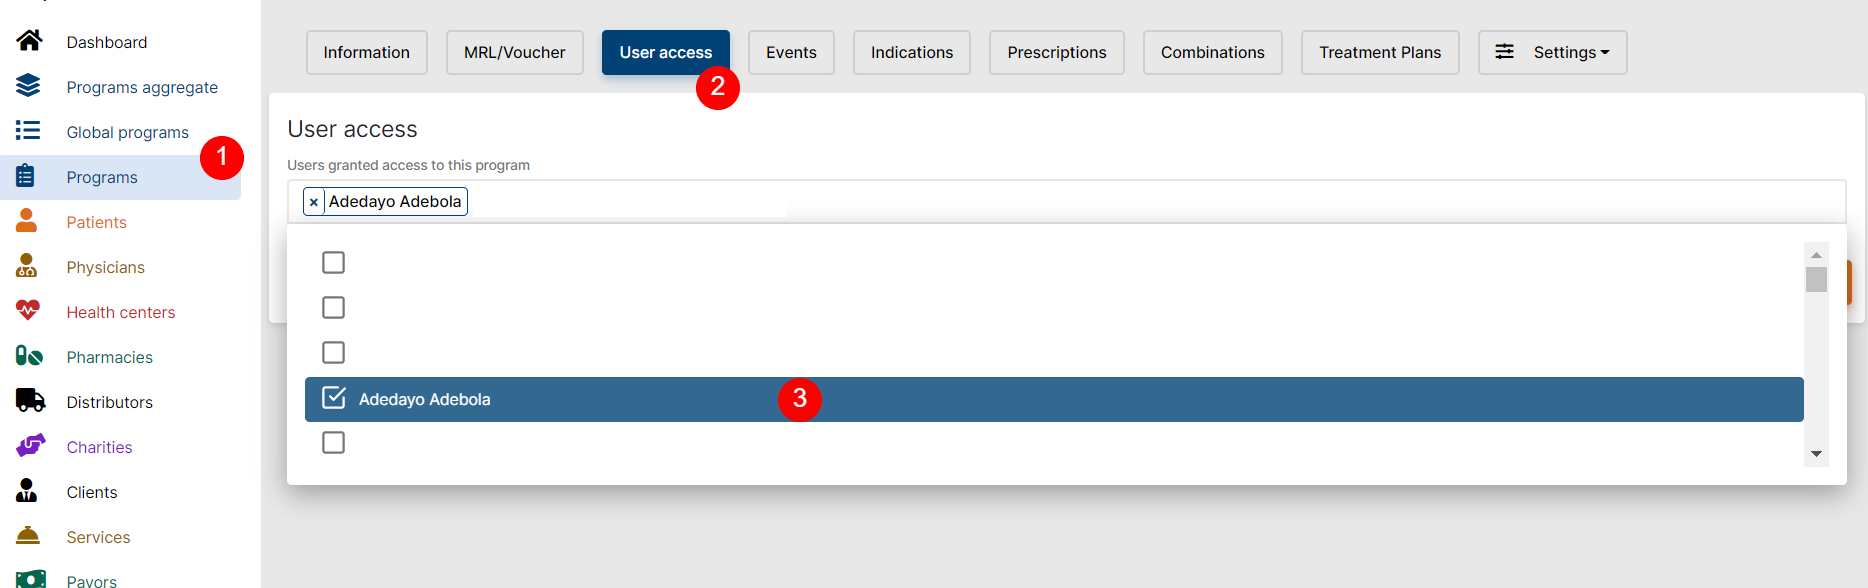
- Access your Local Program
- Go to the User Access tab
- Click on the dropdown and select the relevant people
- Save
 IMPORTANT
According to the Least Privileged Principle, you should only grant access to people that are actively working on your Program.
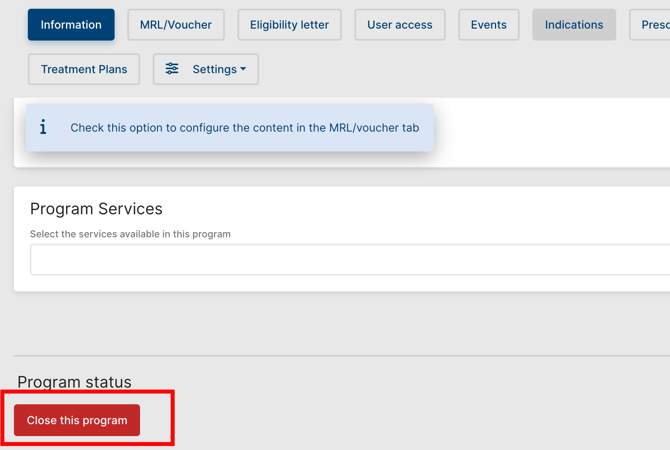
Activate, Delete or Close the Local Program
Once all has been configured, a Program Management Lead should review all parameters, and request the activation of the Program:
-
Access your Local Program
-
On the Information tab, scroll down to the bottom
-
Click "Request activation"

Project Leader will receive the activation request and will activate the program once all parameters have been reviewed. In the meantime, the status of the program will change from Draft to Activation Requested.
Once activated, the status will change to Active. You will also have access to the Program data such as Patients, Adverse Events, MRLs or Vouchers distributed, etc. From then on, you can manage your Local Program fully.
IMPORTANT
Until the program is on the Active status, patients and any other activity won't be possible. To learn more about program statuses, please check the Program & Patient Satuses page.
Deleting the program is also only possible as long as the program is in Draft status.
Should you need to Close the program once it has been activated and has reached its end, the "Close this program" button replaces the "Delete this program".
Going Further
 To learn more about indication, prescription, combination and Standard Treatment Plan configuration for your program, please check the Treatment Configuration article.
To learn more about program content settings for your program, please check the Program Content Configuration article.
To learn more about program data and statistics, please check the Program Data and Statistics article.